

Build a traditional flat weight bench that is durable and can be customized. Avoid the boring colors of a bank to buy and add the pride of a do-it-yourself project. This bench can be painted later and the vinyl (backed fabric, of course) can be chosen with colors or patterns that respond to the tastes of the owner.
Let’s start with step by step instruction on how to build a wood workout Exercise Bench.
Instructions to Build an Exercise Bench:
1. Cut two 3/4 inch standard plywood boards (from the original piece of plywood) both 17 by 55 inches. Consider one of the ends of the narrow top for the purposes of the instructions to follow.
2. Drill a 6-inch top hole that is a 1/2 inch in diameter that centers on 8 1/2 inches on each side. 15 inches below that, drill another 1/2 inch diameter hole. Make sure that this hole is centered, that is, that it centers on the 8.5 inches of both edges cut off from the gasket. To do this, again with a third hole that is centered (8.5 inches from both edges) and 5 inches from the edge at the end.
3. Insert the 3.5-inch bolts into the holes. If the round exceeded the bolts are carriage bolts, this may require a file and a little patience to make each square hole in the wood, but be careful when making the hole is not larger than necessary to accommodate the part square on the bolt from this hole needs to be strong. Use a washer with a hole that matches the diameter of the bolt to press against a wider surface to support the wood when the bolt is stressed. Place this washer between the bolt head and the wood that the bolt passes through the holes in the washer and wood. Use a small drop of hot glue on the edge of the screw to hold it in place (temporarily) until the nut is attached later.
4. Cut a 3-inch thick piece of foam mattress large enough to hang over the edge of the plate all the way around the 3/4 inch board. This means that the foam should be 18.5 by 56.5 inches wide. Make sure the foam is elastic enough to add comfort but still allows the back to be glued to the bench to avoid injury while lifting weights.
5. Cut out a piece of vinyl (or another durable easy-to-clean cloth) that is 6 inches longer on all sides than the original bench to make a piece that is 23 by 61 inches. Place the foam on the board so that it is centered. Do the same with the vinyl on top of the foam. Place a flat board on the top of the foam and make it heavier / tie it so that the foam is compacted against the board equally on all sides and at the edges.
6. Pull the vinyl firmly around the bottom of the plate on all four sides. Fold the vinyl edge before stapling. Staple the vinyl to the joint with a construction stapler. Use staples that are not enough time to travel all the way through the joint (5/8 inch staples are long enough). Use a stack of staples placed at 1-inch intervals. Fold down the corners and staple them too. Release the pressure on the foam once the staples are in place. This is the workbench completed.
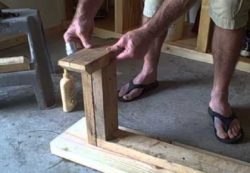
7. Cut thick wall steel bar for weft that is 1 by 1 3/4 inch wide. The long way must be parallel to the ground when making the bench (not perpendicular) in horizontally welded pieces. The wall thickness of the pipe has to be higher for some weightlifters, but most people will be able to get away with the standard stock bar that is used in making a car chassis available online (see resources after reading this article). Cut lengths that are 3 feet (for the length that is screwed to the work table), 18 inches (each for two pieces that go from the bench to the floor), and 3 feet (each for two bars which stabilize the bench and support the floor).
8. Make holes in the bar that corresponds to the hole of the bolts being glued off the work table (bottom). Measurements of the necessary holes in the action of the support bar below the bench are drilled 2.5 inches from the ends and 15 inches apart between the two holes drilled. Mark these measurements with a Sharpie and use the screws that leave the bench to confirm the measurements are correct. Drill the holes with a cobalt bit. Add a few drops of oil to lubricate the drill bit and drill while moving at slower speeds. Use a thick, stable piece of wood as a backing when drilled to prevent the drill bit from damaging the surface underneath (or drill).
9. Weld the bar that has just been drilled to the 18-inch bars. These 18-inch bars are the vertical supports (legs) and when getting bigger, taller or more depending on the needs of the weightlifter. Weld the 18-inch bars with their ends against the bottom of the drill bar at 90-degree angles. Weld these two support rods, 2 inches from each end of the center bar drilled to support the cushioned seat when installed. When the first welds cool down, weld the two support bars to the center of the two legs to form the base, stabilizing the bench. Weld for base bars at 17 1/8 inches from either end with the wide side of the bar facing forward.
10. Place the screws on the bottom of the work table through the holes drilled in the bench and screw them into their nuts securely. Weld a very small point on the nuts so it does not come loose. Do not weld too well in the case if needed later. Underneath the nut, cut the short bolt and file the sharp edges.
Tips & Warnings to Build an Exercise Bench:
Although this is a traditional weight bench, the vinyl can be any color or pattern that is desired by the vinyl builder. Choose it is with fabric backing for durability.
Make sure that the bench and welds are thoroughly tested before use. If you use heavier than normal weight while lifting, try the bench again. Also, make sure tennis balls with holes large enough to fit comfortably around the bar action are used to cover the ends of the exposed bar of values.
The weight of the bench should be enough to keep the tennis balls attached. Always allow welds to cool before touching any part of the bench. File all sharp edges.
Hope this article ‘ how to build a wood workout Exercise Bench ‘ will be helpful to you.


